I know my sense of "difficult" as far as vehicle projects has changed over the years. A brake job was once difficult, ya know?
Still, if a person is detailed and careful and isn't working under some kind of time crunch, rebuilding the power steering rack is totally doable. Took me a single day.
This isn't so much a "how to" post, or even a "what's inside" post. Rather, it's a "you can do it, just be meticulous" post.
Plan ahead. Have ATF on hand to refill the system. Buy the seal kit from a reputable place - I got mine from 944online (Ian). It has all the seals and o-rings. I don't remember if it has new copper crush seals for the banjo bolts, but a person can always re-anneal the old ones with a propane torch and smooth them with fine-grit sandpaper - 220 works just fine. Or get a copper crush washer kit from Harbor Freight / Amazon / your Friendly Local Auto Parts Store. If the rubber gator boots on the tie rods are damaged, have new ones of those on hand too. It's literally the ideal time to replace them.
You will need some way to pop the tie rods ends out of the knuckle, preferably w/o damaging the rubber boots.
- PXL_20230812_190702051.jpg (174.37 KiB) Viewed 1294 times
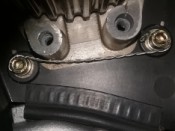
You'll need some big wrenches, picks for removing seals, your favorite blunt screwdrivers, plus a hand-held impact driver so you don't strip the multiple banjo bolts originally installed by what must have been a very angry German. I suppose an impact gun would also work, but don't go full-send on the banjo bolts.
- PXL_20230812_213834126-COLLAGE.jpg (611 KiB) Viewed 1294 times
With the rack centered, make some reference marks on the top cap surrounding the input shaft. That way you'll know for sure the cap is installed correctly and the notch on the input shaft is oriented properly come reassembly. (I don't seem to have a pic of that, but your reference marks only need to make sense to you.)
You can buy the Porsche rack-centering bolt from the usual places. You can also make your own. It is an M10x1.0, which I believe is the "Extra Fine" thread pitch for this diameter bolt. I went to three local hardware stores to find an M10 with this thread pitch. It's a simple matter to shape the end on the bench grinder so it matches the dimple in the steering rack. (I didn't manage to photograph that dimple even once when I had it all apart.) It's accessible via a plastic screw-in plug on the bottom of the main housing body.
- PXL_20230813_223354905.jpg (171.23 KiB) Viewed 1294 times
The internals are impressive.
- PXL_20230812_213639995.jpg (236.11 KiB) Viewed 1294 times
- PXL_20230812_213642294.jpg (363.88 KiB) Viewed 1294 times
The only truly difficult part was removing one miserable seal. It's nearly impossible to get anything behind it. Maybe I need a decent seal puller kit for Xmas. You know, for next time.
- PXL_20230813_181954005-COLLAGE.jpg (222.94 KiB) Viewed 1294 times
There is also a roller bearing where the base of the shaft sits. That one isn't in the kit, but I can't imagine a world where you'd need it. Or a world where you could remove it w/o also removing the plug behind it. I gave some extra care to cleaning it though.
- PXL_20230813_221925514.jpg (94.62 KiB) Viewed 1294 times
The seal kit even includes a new plastic piece for what I'll call the rack pre-tensioner. My pre-tensioner had a large spacer washer between it and the external plate it lives behind. (Don't know if that's factory, or if some shop did that prior to my owning the car - the previous owner was not mechanically inclined to do such a thing, and I know I never did.)
I didn't like the parking-lot-speed feel of the steering with the new much thicker plastic piece on the pre-tensioner and that spacer washer, so I removed the spacer washer (which is do-able with minor fuss with the rack in the car). Much nicer.
- 20231029_210522-COLLAGE.jpg (214.17 KiB) Viewed 1286 times
I worked at a leisurely pace. Took lots of breaks. Listened to podcasts. (Any "Shuttlepod Show" fans?) Stopped for Lunch. And Dinner. Played with the cat. Enjoyed the task. Based on the timestamps on the photos, it took me about 10 hours. That included time to clean and paint the hard lines and make everything presentable.
- PXL_20230814_014016548.jpg (274.47 KiB) Viewed 1294 times
- PXL_20230814_050652275.jpg (113.9 KiB) Viewed 1294 times