


If you decide to do custom exhaust.
https://www.unobtainium.ca/
Located 20 minutes from my house.
I’m in Calgary they are In Strathmore.
944S in Canada - long in the tooth project
I checked out their site. Definitely looks like impressive quality!
Not sure what I will do in the future... Right now I am hoping to get things going nicely with the stock exhaust parts, but it is certainly good to know of a Canadian source that can do custom work. There is not a ton of aftermarket available for the 2.5 S exhaust it seems.
Not sure what I will do in the future... Right now I am hoping to get things going nicely with the stock exhaust parts, but it is certainly good to know of a Canadian source that can do custom work. There is not a ton of aftermarket available for the 2.5 S exhaust it seems.
By the time you are ready I will have something for a turbo done by them500 wrote: Mon Jun 10, 2024 12:15 pm I checked out their site. Definitely looks like impressive quality!
Not sure what I will do in the future... Right now I am hoping to get things going nicely with the stock exhaust parts, but it is certainly good to know of a Canadian source that can do custom work. There is not a ton of aftermarket available for the 2.5 S exhaust it seems.

-
NCGermerican
- Posts: 260
- Joined: Thu Jan 13, 2022 8:49 am
- Location: Raleigh, NC
- Has thanked: 136 times
- Been thanked: 87 times
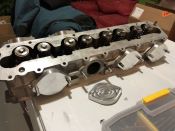
MSDS offers a header for the 16V cars. I have one on my 87 S. Very nice but without a coating it rusts pretty quickly. It also has a 2.5" collector so you need some creative adapting to the factory cat pipe. Honestly it's probably not worth the price.500 wrote: Mon Jun 10, 2024 12:15 pm I checked out their site. Definitely looks like impressive quality!
Not sure what I will do in the future... Right now I am hoping to get things going nicely with the stock exhaust parts, but it is certainly good to know of a Canadian source that can do custom work. There is not a ton of aftermarket available for the 2.5 S exhaust it seems.
https://www.lindseyracing.com/LR/Parts/944HEADERS.html
1987 951 - Nautic Blue over Linen
2015 Audi RS5 Sepang Blue (Daily)
2023 Durango R/T AWD - Destroyer Grey (Wife's Daily)
2013 Audi A5 Quattro - Brilliant Black (Son's daily)
1987 944 S - Nautic Blue over Linen - sold August 2024
2015 Audi RS5 Sepang Blue (Daily)
2023 Durango R/T AWD - Destroyer Grey (Wife's Daily)
2013 Audi A5 Quattro - Brilliant Black (Son's daily)
1987 944 S - Nautic Blue over Linen - sold August 2024
A long gap... basically I have not done anything on the car since June of last year. In the meantime I did MAJOR rust repair on my brother-in-law's Buick Regal (took every weekend of the summer and fall, pretty much) and also got the Subaru project back on the road:
However, we got the 944 project re-started this past weekend.
The spindles are now sorted and one side is done:
When we had put the engine in the car in the spring, none of the wiring was routed or connected, so the first task was just to reacquaint myself with the lay of the land. Routing of all the wiring behind the engine will be tight, so I will have to take some time to get it right. To get things rolling we started with getting the DME harness through the firewall and that monster grommet set in place. It took some effort with the fingers, but it finally settled into place. Between that and the one spindle, that was about as much as we could get done in that session. However, did quickly dump the alternator in just to give a sense of getting more done! Things look pretty cluttered and disorganized in the engine compartment, but it should get better.
We shall see how much gets done in this latest "push"!
- IMG_1353.JPG (3.39 MiB) Viewed 3174 times
- IMG_1544.JPG (3.35 MiB) Viewed 3174 times
The spindles are now sorted and one side is done:
- IMG_2021.JPG (2.51 MiB) Viewed 3174 times
- IMG_2045.JPG (3.26 MiB) Viewed 3174 times
- IMG_2042.JPG (2.02 MiB) Viewed 3174 times
Spent half of Saturday and only got 5% done what I hoped!
Wrestled for an age getting the big clamp for the DME harness as well as the DME ground and battery negative attached to the bell housing.
I guess this was the price to pay for the way I mounted the engine.
Still quite messy, and I have to re-route the injector portion of the harness, but things are starting to fall into their right place:
One thing I did not get done at the back of the engine was the speed sensor bracket. I made and printed a model of a simple "gauge" for setting the bracket to provide the necessary 0.8 mm clearance. Hopefully the install will be a little easier than the other stuff.
Slow, slow, slow...
Wrestled for an age getting the big clamp for the DME harness as well as the DME ground and battery negative attached to the bell housing.
I guess this was the price to pay for the way I mounted the engine.
Still quite messy, and I have to re-route the injector portion of the harness, but things are starting to fall into their right place:
- IMG_2137.JPG (545.53 KiB) Viewed 1698 times
- IMG_2140.JPG (432.47 KiB) Viewed 1698 times
- IMG_2158.JPG (349.99 KiB) Viewed 1698 times
- IMG_2159.JPG (318.31 KiB) Viewed 1698 times
Although it does not look like a lot of progress, this next step took me a lot of time...
I wanted to apply Cerakote to the exhaust parts, and originally wanted to sub it out, but quotes were quite high, so I decided to do it myself, which meant hours of blasting with aluminum oxide to prep the substrate. I had to spread it over multiple evenings to get it to a point that I thought was good enough.
I purchased a half pint of C-series Cerakote and applied it with a 0.8 mm HVLP detail gun and the result looks good. Cerakote has worked really well on my 911 headers, so I am hopeful it performs well here too.
- IMG_2184.JPG (3.36 MiB) Viewed 1546 times
- IMG_2183.JPG (3.11 MiB) Viewed 1546 times
- IMG_2182.JPG (3.8 MiB) Viewed 1546 times
-
Gaspowered
- Posts: 148
- Joined: Sat Jan 11, 2025 4:27 pm
- Location: OK
- Has thanked: 274 times
- Been thanked: 77 times
Looks fantastic!
Cheers
Cheers
Brian
'88 944 Turbo S / Silber Rosa
'88 944 Turbo S / Silber Rosa
Lots of other things going on, which has limited time on this project.
Things are slowly moving though.
moved ahead a bit with tidying the wiring routes in the engine bay:
Clutch slave and lines are in:
The exhaust is installed.
Happy with the fit. I used a stepped band clamp for the slip fit of the flange piece to the back of the mid-pipe. Seems to be a good seal (I also used a film of silicone exhaust sealant on the slip fit. We shall see if it is actually good enough, but I am cautiously optimistic.
Rear view of the exhaust shows off the Glacier Silver Cerakote. I think OEM is for the back half of the muffler to be painted black. Maybe I should have done that, but I am going to leave this as it is.
Things are slowly moving though.
moved ahead a bit with tidying the wiring routes in the engine bay:
- IMG_2435.JPG (2.61 MiB) Viewed 1456 times
- IMG_2431.JPG (2.13 MiB) Viewed 1456 times
- IMG_2429.JPG (1.8 MiB) Viewed 1456 times
- IMG_2443.JPG (1.98 MiB) Viewed 1456 times
- IMG_2449.JPG (2.41 MiB) Viewed 1456 times
- IMG_2451.JPG (2.21 MiB) Viewed 1456 times
- IMG_2452.JPG (2.14 MiB) Viewed 1456 times
- IMG_2456.JPG (2.15 MiB) Viewed 1456 times
- IMG_2458.JPG (1.95 MiB) Viewed 1456 times
Rear view of the exhaust shows off the Glacier Silver Cerakote. I think OEM is for the back half of the muffler to be painted black. Maybe I should have done that, but I am going to leave this as it is.
- IMG_2459.JPG (2.37 MiB) Viewed 1456 times
-
Tom

- Site Admin
- Posts: 8568
- Joined: Fri Jun 25, 2021 2:04 pm
- Location: Silicon Valley, CA
- Has thanked: 891 times
- Been thanked: 3847 times
- Contact:
Everything about your car and your efforts looks spectacular! Just love seeing this level of detail on these car! Keep up the great work!