


FYI, I moved the discussion about hooking up the LR MAP to a new thread, linked below, to keep this thread focused on the actual installation of the Kroon harness.
viewtopic.php?t=3553
Kroon Harness Installation
-
Tom

- Site Admin
- Posts: 8575
- Joined: Fri Jun 25, 2021 2:04 pm
- Location: Silicon Valley, CA
- Has thanked: 891 times
- Been thanked: 3854 times
- Contact:
-
Tom
- Site Admin
- Posts: 8575
- Joined: Fri Jun 25, 2021 2:04 pm
- Location: Silicon Valley, CA
- Has thanked: 891 times
- Been thanked: 3854 times
- Contact:
Made a little progress today.
Below: The KLR tube extended 13 inches into the engine bay on my original harness, so I marked the new one at 13" and pulled it through the firewall snorkel to that mark. Edit: after installing the intake, I would shoot for 14 or 15 inches instead. 13" works, but just barely.
Below: On the cabin end of the tube, the banjo that connects to the KLR box is a type of compression fitting. I had to warm the tube up with a heat gun (not too much) so I could push it over the barb on the fitting. This is how far my original factory tube was pushed on, so I tried to copy the factory.
Below: Then I just screwed the compression piece on all the way, and it's likely the most secure vacuum connection on the whole car.
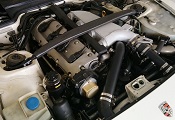
Below: I opted to put the harness in from the engine side. I fed the main DME and KLR connectors through the hold in the firewall, along with the smaller connectors on the cabin-side of the harness (e.g., altitude sensor, red 4-pin connector, diagnostic Kostal connector, etc.).
Below: At first I really struggled to get the snorkel seated in the firewall. There isn't much room to work, and the snorkel is big and clumsy with a deep lip that needs to be seated on the firewall all the way around (much like a grommet, but on steroids). I ended up removing the end cap on the cam tower (the one with 3 bolts and a cork gasket), which gave me a bit more room to work. The other key was getting a lot of light on it, so you can see the rubber lip clearly. I used soapy water on the rubber, and first worked the sealing lip onto the drivers side of the hole (toward the center of the car). Once that side is seated, you have reasonably good access to the passenger side of the snorkel, so you can poke the remaining sealing lip under the firewall hole with a screwdriver or plastic pry tool. I gave up last night, thinking I may need to pull the cam tower, but with a good night sleep, a cup of coffee, and morning sunlight, I was able to get the snorkel fully seated in about 10 minutes.
Below: This picture doesn't do it justice, but shows how the snorkel must be seated in the hole of the firewall. The groove for the firewall is quite deep, making that inside lip a pain to get seated. It's like pushing an 18" tire into a 15" hole. But it is possible!
Below: The KLR tube extended 13 inches into the engine bay on my original harness, so I marked the new one at 13" and pulled it through the firewall snorkel to that mark. Edit: after installing the intake, I would shoot for 14 or 15 inches instead. 13" works, but just barely.
- klr-line-13-inches.jpg (310.55 KiB) Viewed 1431 times
Below: On the cabin end of the tube, the banjo that connects to the KLR box is a type of compression fitting. I had to warm the tube up with a heat gun (not too much) so I could push it over the barb on the fitting. This is how far my original factory tube was pushed on, so I tried to copy the factory.
- KLR-compression-fitting.jpg (347.73 KiB) Viewed 1431 times
Below: Then I just screwed the compression piece on all the way, and it's likely the most secure vacuum connection on the whole car.
- KLR-assembled.jpg (295.34 KiB) Viewed 1431 times
Below: I opted to put the harness in from the engine side. I fed the main DME and KLR connectors through the hold in the firewall, along with the smaller connectors on the cabin-side of the harness (e.g., altitude sensor, red 4-pin connector, diagnostic Kostal connector, etc.).
- kroon-snorkel-1.jpg (614.12 KiB) Viewed 1431 times
Below: At first I really struggled to get the snorkel seated in the firewall. There isn't much room to work, and the snorkel is big and clumsy with a deep lip that needs to be seated on the firewall all the way around (much like a grommet, but on steroids). I ended up removing the end cap on the cam tower (the one with 3 bolts and a cork gasket), which gave me a bit more room to work. The other key was getting a lot of light on it, so you can see the rubber lip clearly. I used soapy water on the rubber, and first worked the sealing lip onto the drivers side of the hole (toward the center of the car). Once that side is seated, you have reasonably good access to the passenger side of the snorkel, so you can poke the remaining sealing lip under the firewall hole with a screwdriver or plastic pry tool. I gave up last night, thinking I may need to pull the cam tower, but with a good night sleep, a cup of coffee, and morning sunlight, I was able to get the snorkel fully seated in about 10 minutes.
- kroon-snorkel2.jpg (666.91 KiB) Viewed 1431 times
Below: This picture doesn't do it justice, but shows how the snorkel must be seated in the hole of the firewall. The groove for the firewall is quite deep, making that inside lip a pain to get seated. It's like pushing an 18" tire into a 15" hole. But it is possible!
- kroon-grommel.jpg (345.58 KiB) Viewed 1431 times
-
Thom
- The First Carpoke!
- Posts: 542
- Joined: Sat Jun 26, 2021 2:31 am
- Has thanked: 132 times
- Been thanked: 147 times
Great work and perfectly detailed, as always. Looking forward to hearing if the engine runs better with the new harness, but I guess it will.
Do you also plan to go with the F9T DME?
Do you also plan to go with the F9T DME?
'90 944 turbo
-
Tom
- Site Admin
- Posts: 8575
- Joined: Fri Jun 25, 2021 2:04 pm
- Location: Silicon Valley, CA
- Has thanked: 891 times
- Been thanked: 3854 times
- Contact:
Yes, I have it ready to go in, with the onboard diagnostics.Thom wrote: Thu Dec 05, 2024 8:29 am Great work and perfectly detailed, as always. Looking forward to hearing if the engine runs better with the new harness, but I guess it will.
Do you also plan to go with the F9T DME?
-
Latitude48
- Posts: 346
- Joined: Fri Jul 16, 2021 7:08 pm
- Location: Seattle Area
- Has thanked: 102 times
- Been thanked: 109 times
- Contact:
In that case, would a stealth MAF that fits in the same location as the AFM pass inspection in Cali? Joe is updating his flowbench so he can finalize the 951 MAF project. If a stealth MAF won't pass inspection, you could get tested with the AFM and then just easily swap over to the MAF. Joe is also talking about a "Mark 2" DME with ZIF socket for the chipTom wrote: Thu Dec 05, 2024 9:07 amYes, I have it ready to go in, with the onboard diagnostics.Thom wrote: Thu Dec 05, 2024 8:29 am Great work and perfectly detailed, as always. Looking forward to hearing if the engine runs better with the new harness, but I guess it will.
Do you also plan to go with the F9T DME?
Tom Pultz
- 1989 944 Turbo - Guards Red/Linen
- 1990 944 S2 - Guards Red/Black
- 2003 Audi 1.8TQ - Denim Blue/Black
- 2003 Honda Civic Si - Vivid Blue/Black
- 2023 VW Golf R Base - Lapiz Blue/Titan Black
- 1989 944 Turbo - Guards Red/Linen
- 1990 944 S2 - Guards Red/Black
- 2003 Audi 1.8TQ - Denim Blue/Black
- 2003 Honda Civic Si - Vivid Blue/Black
- 2023 VW Golf R Base - Lapiz Blue/Titan Black
-
Tom
- Site Admin
- Posts: 8575
- Joined: Fri Jun 25, 2021 2:04 pm
- Location: Silicon Valley, CA
- Has thanked: 891 times
- Been thanked: 3854 times
- Contact:
For right now, I'm interested in seeing what the car feels like in pseudo-stock mode, but may try something like that in due course. The Cobra RTP chip emulator 'should' make the ZIF socket moot, as it will allow me to change the tune without pulling the chip.Latitude48 wrote: Thu Dec 05, 2024 1:16 pm In that case, would a stealth MAF that fits in the same location as the AFM pass inspection in Cali? Joe is updating his flowbench so he can finalize the 951 MAF project. If a stealth MAF won't pass inspection, you could get tested with the AFM and then just easily swap over to the MAF. Joe is also talking about a "Mark 2" DME with ZIF socket for the chip
Made incremental progress on the harness installation today, between vet visits and Christmas tree shopping... So far, the Kroon harness is lining up and plugging in just like the factory harness.
Below: reconnected the alternator exciter/warning connector, which had to be pulled out to get the engine harness out from under the hard brake lines.
- kroon-exciter.jpg (585.15 KiB) Viewed 1374 times
Routed the new harness under the brake lines along the firewall, and connected the main Kostal connector and put the diagnostic port in its holder. The cover for the Kostal connector is getting a bath tonight and will go back on in the morning. It was much easier fishing these under the brake lines to reinstall than it was to remove the originals. Also re-routed the evap braided hose under the brake lines (also removed to get the harness in and out) and reconnected it.
- kroon-kostal.jpg (680.05 KiB) Viewed 1374 times
-
Tom
- Site Admin
- Posts: 8575
- Joined: Fri Jun 25, 2021 2:04 pm
- Location: Silicon Valley, CA
- Has thanked: 891 times
- Been thanked: 3854 times
- Contact:
Once again I had limited time today but made a little progress after buying Mrs. Carpokes a new Subaru Outback. 
The Kroon harness continues to impress with factory-authentic connectors throughout. Posting more pictures as a visual check list for installing the harness....
Below: Cleaned the battery ground with an abrasive wheel before reinstalling on the bellhousing.
Below: After sanding/cleaning the bellhousing, fresh new grounds are in place.
Below: Speed and Reference sensor connectors are labeled by Kroon, making it easier. O2 Sensor connector is just like the factory version, and fits securely in clip I 3D-printed today using our very own Carpokes STL file.
Below: ISV and knock sensor connector.
Below: Did Porsche put these rubber boots on the temp gauge sensor spade connectors? They don't fit over the spades very well, and my old harness did not have rubber boots? Anyone have these on a factory harness?
Below: The 2.7 water neck always makes the DME temp sensor connector a tight fit. Nice touch by Kroon using a blue connector just like the factory.
Below: The short aftermarket temp sensor has a bullet connector that conveniently plugs right into the factory-style connector on the harness. Where Kroon finds things like that connector is beyond me....
Below: Planning to use omega clips like the factory did. These clips were curtesy of @Crazy Eddie, who happened to have a big collection of these things. These may be a tad big, and they changed the color over the years, so I'm mulling the possibility of 3D printing a few in red. Stay tuned.
The Kroon harness continues to impress with factory-authentic connectors throughout. Posting more pictures as a visual check list for installing the harness....
Below: Cleaned the battery ground with an abrasive wheel before reinstalling on the bellhousing.
- Kroon-ground-cleaning.gif (385.31 KiB) Viewed 1339 times
Below: After sanding/cleaning the bellhousing, fresh new grounds are in place.
- Kroon-Ground-Cables-Installed.gif (408.94 KiB) Viewed 1339 times
Below: Speed and Reference sensor connectors are labeled by Kroon, making it easier. O2 Sensor connector is just like the factory version, and fits securely in clip I 3D-printed today using our very own Carpokes STL file.
- o2-clip-speed-ref.gif (535.28 KiB) Viewed 1339 times
Below: ISV and knock sensor connector.
- Kroon-ISV-and-Knock.gif (353.34 KiB) Viewed 1339 times
Below: Did Porsche put these rubber boots on the temp gauge sensor spade connectors? They don't fit over the spades very well, and my old harness did not have rubber boots? Anyone have these on a factory harness?
- kroon-temp-sensor-spades.gif (348.5 KiB) Viewed 1339 times
Below: The 2.7 water neck always makes the DME temp sensor connector a tight fit. Nice touch by Kroon using a blue connector just like the factory.
- kroon-DME-temp-sensor.gif (354.45 KiB) Viewed 1339 times
Below: The short aftermarket temp sensor has a bullet connector that conveniently plugs right into the factory-style connector on the harness. Where Kroon finds things like that connector is beyond me....
- kroon-turbo-temp.gif (333.65 KiB) Viewed 1339 times
Below: Planning to use omega clips like the factory did. These clips were curtesy of @Crazy Eddie, who happened to have a big collection of these things. These may be a tad big, and they changed the color over the years, so I'm mulling the possibility of 3D printing a few in red. Stay tuned.
- kroon-omega-clamps.gif (386.56 KiB) Viewed 1339 times
-
Tom
- Site Admin
- Posts: 8575
- Joined: Fri Jun 25, 2021 2:04 pm
- Location: Silicon Valley, CA
- Has thanked: 891 times
- Been thanked: 3854 times
- Contact:
After looking at those omega clamps more, I decided they were just too big. Despite having every size he could find, none of Ed's omega clamps were a good fit for the Kroon harness. So, as is my way, I modeled and 3D printed my own. I really wanted to do them in red, but the red abs plastic is only good to about 200 degrees F, and given the proximity to the turbo, I was worried they'd melt. So I ended up making them in PAHT-CF, a nylon with carbon fiber filament good to nearly 400F.
Below: The red one in the middle is my 3D-printed version, surrounded by all the sizes I borrowed from Ed. By making my own, I was able to size it 'just right' for the Kroon harness.
Below: They looked nice in red on the car, but I worried they'd melt. Note the fit.
Below: Here are the final clips done in nylon-carbon-fiber. The wire insulation will melt before these do. I opted to move the harness to the leftmost position on that bracket, just to keep the Kroon harness as far from the turbo heat as possible.
Below: The red one in the middle is my 3D-printed version, surrounded by all the sizes I borrowed from Ed. By making my own, I was able to size it 'just right' for the Kroon harness.
- kroon-omega-clips.jpg (183.58 KiB) Viewed 1282 times
Below: They looked nice in red on the car, but I worried they'd melt. Note the fit.
- kroon-omega-redabs.jpg (553.47 KiB) Viewed 1282 times
Below: Here are the final clips done in nylon-carbon-fiber. The wire insulation will melt before these do.
- kroon-omega-blackcf.jpg (590.69 KiB) Viewed 1282 times
-
Tom
- Site Admin
- Posts: 8575
- Joined: Fri Jun 25, 2021 2:04 pm
- Location: Silicon Valley, CA
- Has thanked: 891 times
- Been thanked: 3854 times
- Contact:
Next up was the oil sender.
Below: I tied a piece of wire to the old harness when I removed it to use as a pull cord for the new wires. The harness snakes behind the timing belt cover and is a bit of a chore to route properly without the cord.
Below: The sender has two posts, one for the oil pressure reading on the gauge, marked G; and the other for the warning light, marked WK. The Kroon harness is faithful to the factory harness, with a blue wire with white strip for the Gauge post, and a solid blue wire for the WK post.
Below: The original factory sender used one spade connector and one eye ring connector. My sender, however, used 2 eye rings instead, which is common. True to the original, the Kroon harness comes with one spade and one eye ring connector.
Below: I was not about to modify my perfect Kroon harness, so instead made a copper spade tab to install on the sender, just like the factory senders have. I used. .025" thick copper and my trusty CNC router to make the spade. Sure, I could have made one with tin snips and a drill, but what's the fun in that.
Below: I tied a piece of wire to the old harness when I removed it to use as a pull cord for the new wires. The harness snakes behind the timing belt cover and is a bit of a chore to route properly without the cord.
- oil-sender-pull-cord.gif (329.37 KiB) Viewed 1278 times
Below: The sender has two posts, one for the oil pressure reading on the gauge, marked G; and the other for the warning light, marked WK. The Kroon harness is faithful to the factory harness, with a blue wire with white strip for the Gauge post, and a solid blue wire for the WK post.
- kroon-oil-sender-hook-up.gif (317.43 KiB) Viewed 1278 times
Below: The original factory sender used one spade connector and one eye ring connector. My sender, however, used 2 eye rings instead, which is common. True to the original, the Kroon harness comes with one spade and one eye ring connector.
- kroon-spade.jpg (329.98 KiB) Viewed 1278 times
Below: I was not about to modify my perfect Kroon harness, so instead made a copper spade tab to install on the sender, just like the factory senders have. I used. .025" thick copper and my trusty CNC router to make the spade.
- spade-making.jpg (265.53 KiB) Viewed 1278 times
- kroon-spade-on-post.jpg (343.72 KiB) Viewed 1278 times
- kroon-sender-with-wires-on.jpg (397.39 KiB) Viewed 1278 times
-
Latitude48
- Posts: 346
- Joined: Fri Jul 16, 2021 7:08 pm
- Location: Seattle Area
- Has thanked: 102 times
- Been thanked: 109 times
- Contact:
Thanks for this thread, Tom. It's going to be very helpful as I just ordered one of these harnesses for our 951 since the exchange rate is currently pretty good. I added the MAF option, which includes a switched, unterminated 12V wire from the 14-pin connector at the firewall to the area of the AFM.
Tom Pultz
- 1989 944 Turbo - Guards Red/Linen
- 1990 944 S2 - Guards Red/Black
- 2003 Audi 1.8TQ - Denim Blue/Black
- 2003 Honda Civic Si - Vivid Blue/Black
- 2023 VW Golf R Base - Lapiz Blue/Titan Black
- 1989 944 Turbo - Guards Red/Linen
- 1990 944 S2 - Guards Red/Black
- 2003 Audi 1.8TQ - Denim Blue/Black
- 2003 Honda Civic Si - Vivid Blue/Black
- 2023 VW Golf R Base - Lapiz Blue/Titan Black