


For paint based fixes, there are a few nice options for flat/satin blacks that seem to hold up well on the interior. I remain interested in seeing how things develop with your work, @Tom.
Cheers
Those spots on old instrument clusters....
-
Zirconocene
- Posts: 191
- Joined: Mon Apr 04, 2022 4:59 pm
- Location: PDX Adjacent
- Has thanked: 77 times
- Been thanked: 48 times
Cheers
1990 928 GT
1990 928 S4
1991 944 S2
1993 968
2002 911 C2
1990 928 GT
1990 928 S4
1991 944 S2
1993 968
2002 911 C2
-
dlarsen944

- Posts: 9
- Joined: Tue Aug 23, 2022 2:01 pm
- Location: Lincoln University, PA
- Been thanked: 6 times
I had the white spots on the instrument cluster plastic surround. Looked like the measles. I took apart the cluster, sanded the plastic and repainted the plastic with a flat black spray paint. Did this about 2 years ago. Still happy with the results.
download/file.php?mode=view&id=11946
download/file.php?mode=view&id=11946
- Add Pictures/Files
-
- Instrument Cluster 294xxx.jpg (4.69 MiB) Viewed 1945 times
DLarsen
Chester County PA
1986 944 n/a
Chester County PA
1986 944 n/a
-
Tom

- Site Admin
- Posts: 8562
- Joined: Fri Jun 25, 2021 2:04 pm
- Location: Silicon Valley, CA
- Has thanked: 890 times
- Been thanked: 3840 times
- Contact:
That looks outstanding! Any particular paint you used? Were you able to get the lens off in one piece and just glue it back on?dlarsen944 wrote: Sat Nov 04, 2023 6:04 am I had the white spots on the instrument cluster plastic surround. Looked like the measles. I took apart the cluster, sanded the plastic and repainted the plastic with a flat black spray paint. Did this about 2 years ago. Still happy with the results.
download/file.php?mode=view&id=11946
-
dlarsen944
- Posts: 9
- Joined: Tue Aug 23, 2022 2:01 pm
- Location: Lincoln University, PA
- Been thanked: 6 times
I used a rust-oleum flat black spray paint (made for use on a variety of materials included plastics). Took my time spraying the paint, as to avoid runs (3 light coats). The lens wasn't much of a challenge removing, as the adhesives age was losing its grip. I also used Meguiars PlastX polish to remove any fine scratches in the lens. Gluing it back on, I used a Loctite product for plastics.
DLarsen
Chester County PA
1986 944 n/a
Chester County PA
1986 944 n/a
-
j1nx3d
- Posts: 56
- Joined: Tue Jul 06, 2021 6:07 pm
- Location: New Zealand
- Has thanked: 96 times
- Been thanked: 22 times
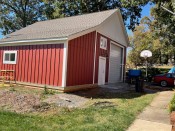
I sanded and painted mine. The spotting on mine wasn't too bad, but I didn't know that until I tried to get a replacement from a well-known US breaker and it was worse! Definitely not worth the money and effort to ship and import to me in NZ.
I used flat black SEM paint and it came out great!
I used flat black SEM paint and it came out great!
- Add Pictures/Files
-
- Refurbed '86 cluster
- gauges.JPG (113.02 KiB) Viewed 1893 times
-
- bad donor
- 20210520_163923.jpg (3.62 MiB) Viewed 1893 times
CGM '86 944S3 conversion
(968 3.0L, 6 -spd LSD)
(968 3.0L, 6 -spd LSD)
-
Tom
- Site Admin
- Posts: 8562
- Joined: Fri Jun 25, 2021 2:04 pm
- Location: Silicon Valley, CA
- Has thanked: 890 times
- Been thanked: 3840 times
- Contact:
Bumping this one to give a thumbs up to this 'ceramic' trim restorer from Griot's. I bought it on a whim, but have to say it creates a very nice look on the black plastic -- not greasy or shiny, just newer looking. 
- griots.gif (454.97 KiB) Viewed 1785 times
- binnicle.gif (504.49 KiB) Viewed 1785 times
-
zooklm1
- Posts: 222
- Joined: Thu Feb 10, 2022 11:15 am
- Location: Huntsville AL
- Has thanked: 17 times
- Been thanked: 51 times
Tom,
Did you use this on the bezel you had already heat treated to remove spots or on a spotted bezel? I started with the heat gun approach but am rethinking using a painting approach as I discovered some cracks in my plastic and the heat caused them to become more visible.
Did you use this on the bezel you had already heat treated to remove spots or on a spotted bezel? I started with the heat gun approach but am rethinking using a painting approach as I discovered some cracks in my plastic and the heat caused them to become more visible.
-
Tom
- Site Admin
- Posts: 8562
- Joined: Fri Jun 25, 2021 2:04 pm
- Location: Silicon Valley, CA
- Has thanked: 890 times
- Been thanked: 3840 times
- Contact:
Bummer -- so sorry, hope I did not steer you in the wrong direction.zooklm1 wrote: Fri Jan 26, 2024 8:53 am Tom,
Did you use this on the bezel you had already heat treated to remove spots or on a spotted bezel? I started with the heat gun approach but am rethinking using a painting approach as I discovered some cracks in my plastic and the heat caused them to become more visible.
I always heard the white spots in the cluster were almost a type of mold. I never gave it much thought, but it would track, I see it more often on cars that were stored outdoors at some point of their lives - the longer the more spots, etc.
Either way, that is different than the sun fading that happens on black trim. The used-car-salesman trick of using a torch brings some of the oils to the surface of the trim and 'restores' the look. But it will soon fade, and it makes the piece more brittle, so it's not a long term fix. Sun fade can be mostly fixed by just cleaning the crap out of the part, basically you are cleaning it to remove that oxidized layer.
On mine, I popped the clear plastic off and did the SEM black trim paint method as others mentioned, I popped the colored warning lights out and went to town. Semper's dash light kit, painted the needles (also repaired some gauges, etc). I do have the Lutz Auto circuit replacement sitting in a box here, the ribbon on mine is very shaky - the replacement from a 2nd hand cluster wasn't much better.
- IMG_2138.JPG (1.23 MiB) Viewed 1543 times